The Rainy Day Lifesaver Nobody Talks About
Last Tuesday, I found myself staring at three bored kids while rain hammered against our windows for the fourth consecutive day. The tablet batteries were dead, we'd already built every blanket fort configuration known to humanity, and someone had just asked "what can we do now?" for the fifteenth time in an hour.
That's when I spotted them: a stack of paper plates sitting on the counter from last weekend's barbecue.
Paper plates are the most underrated craft supply in your kitchen. I'm serious. While parents spend hundreds on elaborate craft kits that require seventeen different materials and create Pinterest-worthy disasters, you've got a goldmine sitting in your pantry right now.
Here's what I've learned after two years of emergency craft sessions: kids don't want perfection. They want to create something right now that makes them feel proud. And honestly? You don't have time for complicated projects that require a trip to three different stores and two hours of prep work.
These aren't the crafts that'll win any awards, but they're the ones that'll actually happen. Every single project below takes less than 30 minutes, uses supplies you probably have, and creates zero guilt when your 4-year-old gets bored halfway through.
I've tested all 18 of these with my kids (ages 3, 6, and 8) and their friends. Some became instant favorites. Others lasted exactly as long as their attention spans. All of them bought me enough time to finish my coffee while it was still warm.
Why Paper Plates Are Actually a Parent's Secret Weapon
I used to be that parent buying themed craft kits every time I went to Target. You know the ones – $12.99 for materials that create one project, require perfect timing, and generate enough mess to justify hiring a cleaning service.
Then I discovered what paper plates can actually do.
Cost-effective doesn't begin to cover it. A pack of 50 paper plates costs about the same as one craft kit, but creates enough projects to last months. I've literally never run out of paper plate crafts before running out of paper plates.
Zero prep time. This is huge for busy parents. No measuring, no cutting complicated templates, no reading through five pages of instructions before you start. Grab plates, grab markers, go.
Cleanup is basically nonexistent. When you're done, most of the mess is contained on the plate itself. Compare that to glitter (which I'm convinced is actually impossible to fully remove from any surface) or paint projects that somehow end up on every wall in a 10-foot radius.
They build real creativity. When kids aren't following step-by-step instructions to create identical results, they start problem-solving. My 6-year-old figured out how to make her lion mask's mane look more realistic by layering different colored strips. That kind of innovation doesn't happen with rigid craft kits.
Here's my personal revelation: I stopped buying fancy craft supplies and started raiding my own kitchen. Paper plates, coffee filters, aluminum foil, paper bags – it's all craft material. And the kids actually prefer it because they can experiment without worrying about "wasting" expensive supplies.
What Can You Make with Paper Plates for Kids?
The variety honestly surprised me when I first started exploring this. We're not talking about just drawing faces on plates and calling it art.
These 18 crafts break down into categories that hit different interests: animal crafts for the nature-obsessed kids, masks and faces for the drama enthusiasts, spinning and moving toys for the kids who love physics without knowing it, decorative items for the ones who want to beautify their space, and games for the competitive spirits.
Last week alone, my 6-year-old made three different animal crafts from one pack of paper plates: a lion mask she wore to "hunt" her little brother, a butterfly she insisted on hanging in her bedroom window, and a fish she gave to her grandmother "because Grandma loves fish." Same basic supply, completely different outcomes.
The difficulty ranges from "my 3-year-old can do this independently" to "my 8-year-old stayed focused for 25 minutes straight." But here's the beautiful part – every single craft can be customized. The lion mask becomes a lioness with different colored mane. The superhero mask gets personalized powers. Kids make them their own without any extra effort from you.
The real magic happens when kids start combining ideas. My daughter made a butterfly mask by combining techniques from two different projects. That kind of creative thinking is exactly what we want to encourage, and it happens naturally when you give kids basic materials instead of rigid instructions.
How Do You Make Easy Paper Plate Crafts?
The Three-Step Formula That Works Every Time
After making roughly 847 paper plate crafts (okay, I haven't actually counted, but it feels accurate), I've discovered there's a simple framework that makes every project successful.
Step 1: Gather (and it's actually minimal). This isn't the step where you realize you need to run to three different stores. If you don't have it in your house right now, skip that craft and pick a different one. The best paper plate crafts use what you've already got.
Step 2: Create (the actual fun part). This is where kids get to make decisions, mess up, try again, and figure things out. Your job isn't to make it perfect – it's to help when they get genuinely stuck and celebrate when they solve problems themselves.
Step 3: Display (because recognition matters). Kids want to see their work valued. That doesn't mean keeping every single craft forever, but it means giving each one a moment of appreciation. Tape it to the fridge, hang it in a window, or let them wear it around the house. This step takes 30 seconds and makes the difference between a forgotten activity and a cherished memory.
The Supplies Checklist (You Probably Have 90% of These)
Essential supplies (the non-negotiables):
- Paper plates in various sizes (small ones work great for younger kids)
- Markers, crayons, or colored pencils
- Glue stick and liquid glue (both – trust me on this)
- Child-safe scissors
Optional supplies (the upgrade materials):
- Googly eyes (these make everything 47% more exciting)
- Stickers
- Yarn or string
- Construction paper
- Paint (if you're feeling brave)
I keep all of this in a small plastic bin under my kitchen sink. When someone announces they're bored, I can have supplies on the table in under two minutes. Game changer.
The Golden Rule for Under-30-Minute Crafts
If it requires more than 2-3 steps, it's too complicated. I learned this the hard way after attempting an elaborate paper plate clock that required precise measurements, number placement, and functional moving parts. Forty-five minutes later, I was doing 90% of the work while my kids wandered off to find something actually engaging.
Pre-cut any complex shapes if needed. If a project requires perfect circles or intricate cuts, I do those while the kids brush their teeth or during other transition times. When craft time starts, they can jump straight into the creative part.
Let imperfection be the point. The goal isn't a craft fair entry – it's 20 minutes of focused, creative play that results in something your child feels proud of. Crooked lines and asymmetrical features are features, not bugs.
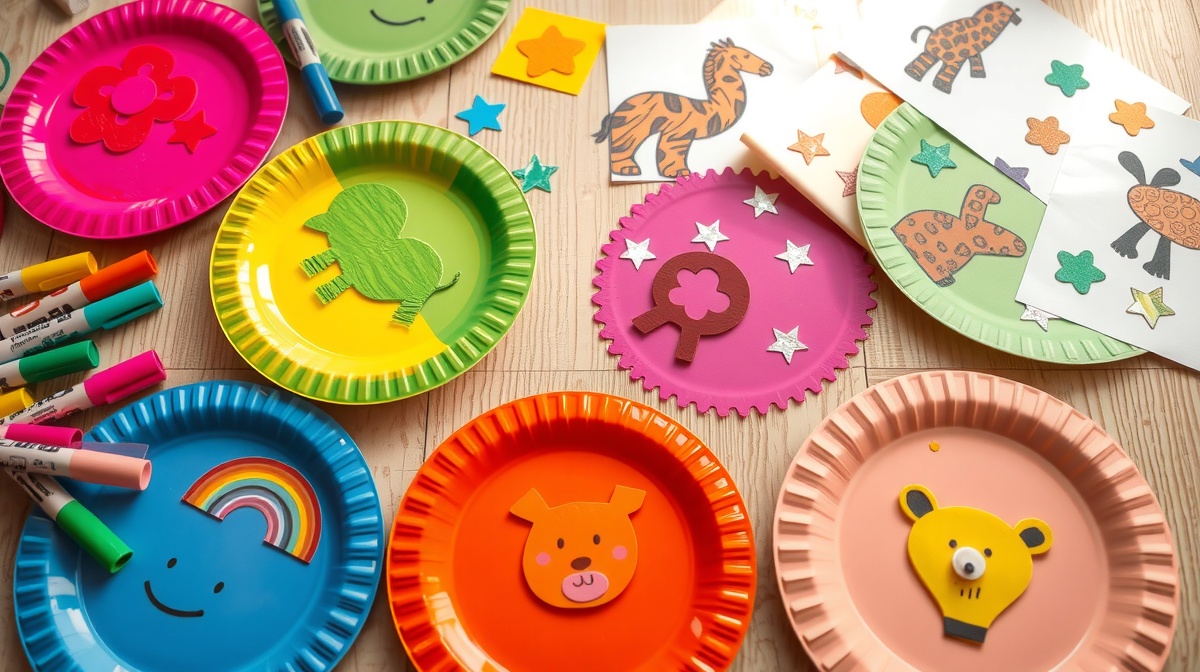
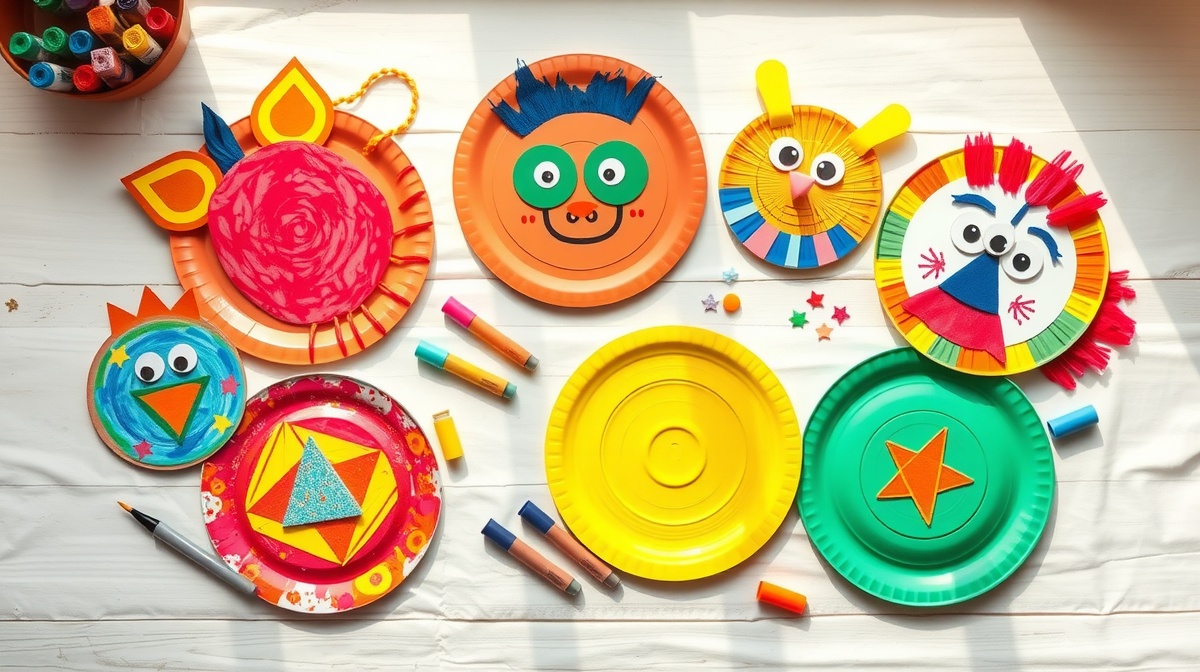
The 18 Crafts (Organized by Type)
Animal Crafts Section
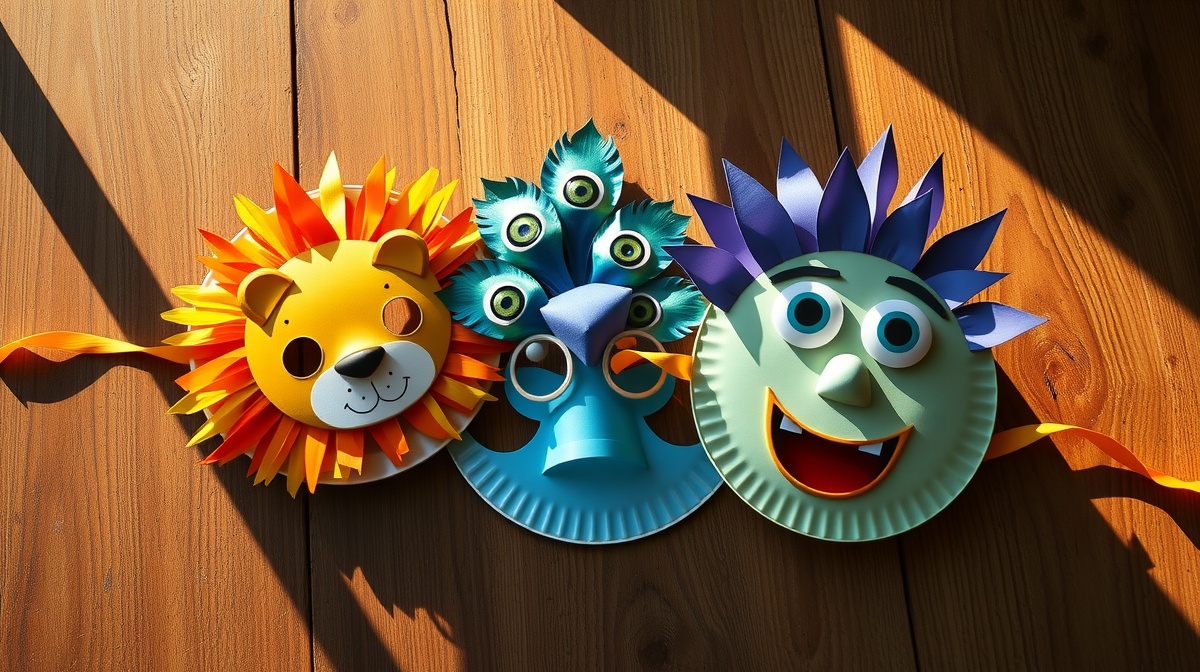
1. Paper Plate Lion Mask
This is the confidence-booster craft. Every kid I've tried this with ends up feeling like they've created something genuinely impressive in under 15 minutes.
What you need: 1 paper plate, yellow markers or paint, yarn or construction paper strips, googly eyes, glue stick
Quick steps: Color the plate yellow (or leave white if you prefer a white lion), glue yarn or paper strips around the edges for a mane, add googly eyes and draw a nose. Cut eye holes if they want to wear it.
Why it works: It looks immediately recognizable as a lion, even with imperfect execution. Kids can wear it right away for imaginative play, which extends the value of the craft time.
My 4-year-old wore his for three straight days and insisted on eating lunch while "being a lion." Sometimes the crafts that seem simplest create the most lasting joy.
2. Butterfly with Folded Wings
This one teaches a basic folding technique while creating something genuinely beautiful to display.
What you need: 2 paper plates, markers or paint, glue, pipe cleaners (optional)
Quick steps: Fold each plate in half, let kids decorate the outsides with whatever patterns they want, then glue the folded edges together. Add pipe cleaner antennae if you have them.
Time-saver tip: There's no "right" way to decorate butterfly wings. Let kids go completely wild with colors and patterns. The asymmetry actually makes them look more realistic.
My daughter made five of these in one afternoon to give to her grandparents. They're now displayed in various windows around my parents' house, and she feels incredibly proud every time she sees them.
3. Fish with Tissue Paper Scales
Perfect for sensory-focused kids who love the texture of tissue paper.
What you need: 1 paper plate, tissue paper in various colors, glue, black marker
Quick steps: Have kids tear tissue paper into small pieces (no precision required), glue them onto the plate in overlapping layers to look like scales, then add an eye and mouth with marker.
Why it works: The tearing and layering is therapeutic, and tissue paper is forgiving – there's no way to mess this up. Plus, you can hang multiple fish from the ceiling to create an underwater effect in their room.
4. Owl with Folded Ears
This introduces simple geometry concepts while creating a recognizable character.
What you need: 1 paper plate, brown markers or paint, construction paper triangles, googly eyes
Quick steps: Color the plate brown, fold the top corners down to create ear shapes, add googly eyes and a triangle beak cut from construction paper.
Pro tip: Use a paper hole punch to create perfect circles for eyes if you don't have googly eyes. Kids love using the hole punch, and it gives them a sense of using "real tools."
Mask & Face Crafts Section
5. Simple Superhero Mask
Every kid needs to feel powerful sometimes. This delivers that feeling in about 12 minutes.
What you need: 1 paper plate, markers, yarn or elastic string, scissors
Quick steps: Cut eye holes, let kids design their superhero symbol or lightning bolts, attach string to hold it on their face.
Why it works: Kids immediately start creating backstories for their superhero personas. The craft becomes a launching pad for hours of imaginative play.
Variation: Make villain masks too. Sometimes kids want to explore being the bad guy, and that's perfectly normal creative play.
6. Peacock Mask with Feather Details
This one always gets compliments from other adults, which makes kids feel incredibly proud of their work.
What you need: 1 paper plate, construction paper, markers, glue, scissors
Quick steps: Cut feather shapes from colored paper (or have kids draw feather patterns on paper strips), glue them around the edge of the plate, add colorful eye details to the center.
Time tip: Pre-cut feather shapes if you're working with younger kids. Older kids can cut their own and make them all different sizes.
I've made this craft with groups of kids, and every single peacock mask ends up looking completely unique. It's impossible to mess up, but the results always look intentional and artistic.
7. Monster Face Mask (The Silly Version)
This is the "permission to be weird" craft, and kids absolutely love it.
What you need: 1 paper plate, markers, googly eyes (lots of them), yarn scraps, glue
Quick steps: Draw monster features however kids imagine them, glue on multiple googly eyes in random places, add yarn hair that sticks out in all directions.
Why it works: There's literally no "wrong way" to make a monster. Kids who usually worry about making things look "right" can relax and get creative.
Bonus: Perfect for Halloween, but also great for random Tuesday afternoons when someone needs to be silly.
Spinning & Moving Crafts Section
8. Paper Plate Spinner Toy
This introduces basic physics concepts while creating something mesmerizing to watch.
What you need: 2 paper plates, metal brads or paper fasteners, markers, optional beads
Quick steps: Let kids decorate both plates however they want, place one plate on top of the other, push a brad through the center of both plates, spin the top plate.
Why it works: Kids love watching the colors blend together when it spins. It teaches cause and effect while being genuinely entertaining.
Variation: Add small beads between the plates before fastening for a rattling sound effect.
9. Whirligig Wind Catcher
This combines indoor crafting with outdoor observation.
What you need: 1 paper plate, markers, string, scissors
Quick steps: Decorate the plate, cut a spiral from the outside edge toward the center (leaving about 2 inches in the middle uncut), hang outside with string.
Why it works: Kids get immediate feedback when they hang it outside and watch it spin in the breeze. It connects their indoor creativity with outdoor science.
My kids made these and then spent 30 minutes just watching them spin and discussing why some spun faster than others. Unintentional physics lesson achieved.
10. Paper Plate Pinwheel
A classic craft with reliable results.
What you need: 1 paper plate, markers, brad fastener, wooden stick or dowel
Quick steps: Decorate the plate, make cuts from edge toward center (about 8 cuts total), fold every other section toward the center, secure with brad, attach to stick.
Pro tip: If using wet paint, let it dry completely before folding. Wet paint will smear and create frustration.
Decorative & Wearable Crafts Section
11. Stained Glass Effect Plate (Tissue Paper Version)
This looks like a fancy art project but takes about 20 minutes total.
What you need: 1 paper plate, colored tissue paper, glue stick, black marker
Quick steps: Draw a simple design with black marker (like a flower or geometric pattern), cut or tear tissue paper into small pieces, glue tissue paper inside the outlined sections, hang in a window.
Why it works: When light shines through the tissue paper, it creates a genuine stained glass effect. This is the craft I actually frame and keep – it looks gallery-worthy.
12. Painted Mandala Plate
Surprisingly meditative for both kids and adults.
What you need: 1 paper plate, paint or markers, optional stencils for perfect circles
Quick steps: Start from the center and work outward with repeating patterns. No specific design required – just encourage symmetry and repetition.
Why it works: The repetitive nature is calming and helps kids focus. It's therapeutic for anxious kids and engaging for kids who love detailed work.
13. Paper Plate Clock (Learning Version)
Educational and functional, if you want it to be.
What you need: 1 paper plate, markers, brad fastener, construction paper for hands
Quick steps: Write numbers around the edge like a clock face, cut clock hands from construction paper, attach with brad fastener, use to practice telling time.
Why it works: Kids learn while creating something they can actually use. My 6-year-old made one and kept it on her nightstand to practice reading time.
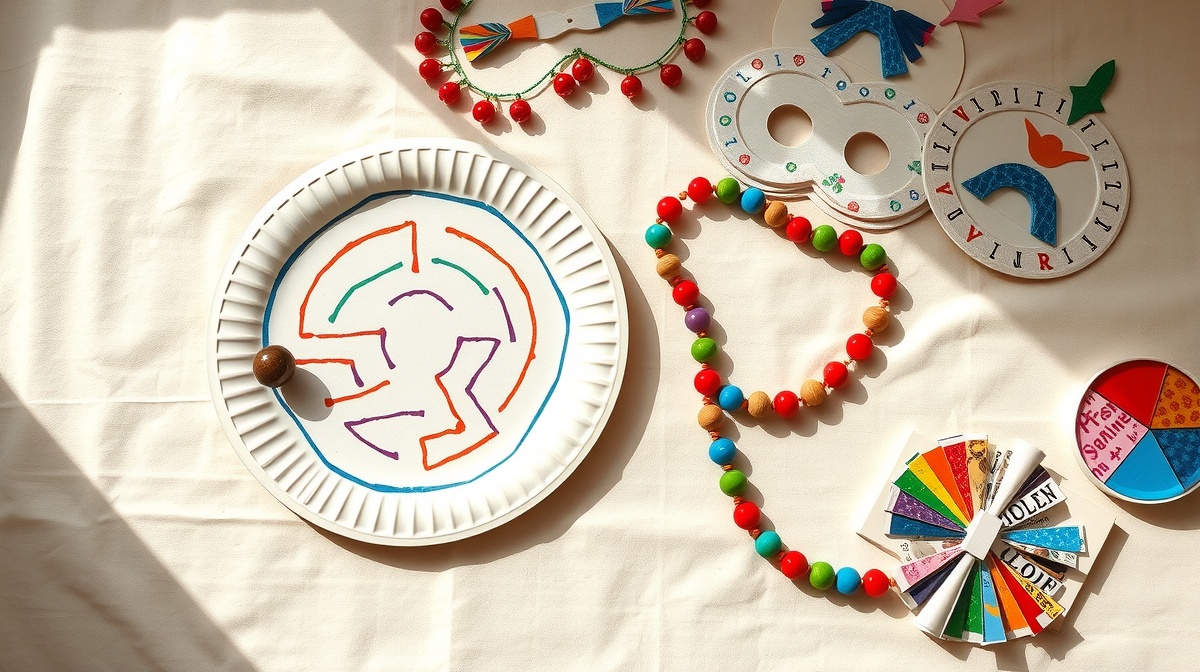
14. Beaded Paper Plate Necklace
Wearable art that kids actually want to show off.
What you need: 1 paper plate, markers, string or yarn, scissors, optional beads
Quick steps: Cut the plate into strips or fun shapes, decorate each piece, thread onto string with or without additional beads.
Why it works: Kids can wear their creation immediately and show it off to friends. It combines crafting with fashion, which appeals to kids who love accessories.
Games & Interactive Crafts Section
15. Paper Plate Maze Game
This challenges problem-solving skills while creating a reusable game.
What you need: 1 paper plate, markers, small marble or bead, clear tape
Quick steps: Draw a maze design on the plate, tape strips of paper to create walls, use marble to navigate the maze by tilting the plate.
Why it works: Kids design their own game, then get to play it. They often make multiple versions with increasing difficulty.
16. Memory Match Game Plates
Perfect for younger kids working on memory skills.
What you need: 6-8 paper plates, markers or stickers
Quick steps: Create matching pairs by drawing identical pictures on two plates each, place face down, play memory match.
Why it works: Kids create their own game pieces, which makes them more invested in playing. Plus, you can customize the difficulty by using more or fewer pairs.
17. Paper Plate Ring Toss Game
Active play that works indoors or outdoors.
What you need: 3-4 paper plates, scissors, empty water bottles, markers
Quick steps: Cut the centers out of paper plates to create rings, decorate the rings, set up water bottles as targets, toss rings to score points.
Why it works: Combines crafting with active play. Kids can adjust the difficulty by changing the distance or size of targets.
18. Storytelling Wheel
This one encourages creative storytelling and imaginative play.
What you need: 2 paper plates, brad fastener, markers
Quick steps: Cut a window in one plate, draw different story elements (characters, settings, objects) around the edge of the second plate, attach with brad so kids can spin to create random story combinations.
Why it works: Gives kids prompts for creative storytelling without being too structured. My kids use theirs during car rides to create elaborate adventure stories.
The Real Truth About Crafting with Kids
Here's what I've learned after hundreds of paper plate projects: the goal isn't creating museum-quality art. It's buying yourself 20-30 minutes of focused activity that makes your kids feel proud and creative.
Some of these crafts will become treasured keepsakes. Others will break within an hour, and that's completely fine. The value is in the making, not necessarily in the keeping.
The best craft sessions happen when you sit down and make one too. Kids love when adults participate in their creative process, and honestly, some of these projects are genuinely relaxing for stressed parents.
Don't feel guilty about crafts that don't get finished. If your 4-year-old loses interest halfway through the butterfly mask, let them stop. The goal is engagement, not completion. Sometimes 15 minutes of focused creativity is exactly what they needed.
Keep your expectations realistic. These aren't Pinterest-perfect projects. They're real-life, busy-parent solutions that create genuine moments of creativity and pride.
Most importantly: paper plates are cheap enough that you can let kids experiment, mess up, and try again without any stress about wasting expensive materials. That freedom to experiment is where real creativity flourishes.
The next time you hear "I'm bored" and feel that familiar parent panic, remember: you've got a stack of craft supplies sitting in your kitchen cabinet right now. Grab the paper plates, dump out the marker box, and watch what happens. I guarantee it'll be more entertaining than whatever's on Netflix.